Tuesday, November 30, 2010

Equal Opportunity Quilting

So one day my cousin emails me and says, no fair. She says I am a discriminatory quilter. It seems, she pointed out, I only made quilts for people who got married or had children. Is that, she asked, what one has to do in order to get a quilt from me? Though not absolutely true (there was the bedspread for my parents), the lady had a point.

Having this gross discrimination pointed out to me, I immediately started planning an equal opportunity quilt. I wanted something colorful, but not too crazy (more about my crazy colorful period in a different post). I wanted it big enough to fit her bed, though I didn't know if she'd use it for that. I also knew I wanted to use fabric from my stash (yes, I know, that seems to be a pattern. You'd think, with all this using up the stash stuff, my stash would dwindle, but no. It doesn't. Very odd). I looked around, in my books and such and decided on a pattern some call stepping stones, though I've also heard it called, squares or boxed squares. I cut some squares and some strips of various fabrics (thankful  for rotary cutters) and started constructing the stepping stones. I wasn't sure how I'd put the whole thing together but eventually decided to alternate. I thought this would give the quilt more cohesion as a pattern.

 Detail? Sure:


It was fun for me to see how the different fabrics go together when put next to the blue (which has tiny details in white that you cannot see in this picture).

I put it in the mail and sent it off to my cousin. She texted me a picture of it as soon as it was on her bed. That made me happy

quilting for household peace

One winter, several years ago, I decided to use left over fleece to make us a throw for the couch. I had gotten the fleece to make ponchos for the girls the previous winter, and had enough of it, along with a solid blue fleece, to make a simple patchwork quilt, this:


I cut the fleece into 5-inch squares, tossed them on the floor, and started sewing them into strips, without planning the order.  The backing is flannel I'd bought for a project that never happened, and the whole thing here was ridiculously quick and easy to make. I did it in a weekend. When I presented it to the girls they immediately declared it was the best throw in the house and started fighting over it. It fit them better than their baby blankets, but was too small to share.
Trying to keep the peace in the house, I set to make another throw. I knew I wanted to use up fabric I already had, and knew it needed to be warm, to give the same cuddly feeling as the fleece. Corduroy came to the rescue. This time I used fabric left over from dresses I'd made all the girls a couple of years previously (I make the kids things for winter presents...). I cut the fabric into 6 inch strips and started laying it down on the floor. I put a bit more thought into this one. It looked too....uniform somehow, even though the strips were different. To break this up I suddenly had the idea of sewing some stripes perpendicular to the others. The backing is a length of fleece I'd bought at a garage sale years before.

Here it is:


And a detail, the better to see the perpendicular stripes:


When this second one was presented to the girls, the fighting stopped. Both girls were happy. The throws have worked great over the years, being big enough for the girls to grow with them. On cold nights each girl will still take one of these to her bed, throwing it on the bed, sometimes between them and the regular blanket.
These throws are some of my first attempts at working without a pattern. I found it so liberating I began to do more quilts like that.

Sunday, November 28, 2010

Kid craftiness

I like doing art with my kids.

We always have craftiness kits, and loose material all over the house. We have a full Armoire dedicated to paints, papers, colors, things to glue, beads, yarn, and so on. I encourage creativity and am pretty much always available to help.

A few years ago, when Shira was in 4th grade, I decided to do a project with her class. We did this in several stages. First I came into the classroom and talked to the kids about the concept of it. I explained that I would bring in fabric squares and markers, and they would draw. I would then sew all the squares into a quilt and we'd put it up for sale at the annual fundraiser. The kids came up with a theme for the quilt. They couldn't decide between superheroes and aliens, and so decided to have superhero aliens as their theme. They did some sketching and drawing, and then I came back and we colored for an hour or so. Some kids needed more guidance than others, and I circulated among them and helped out. The teacher basically had the time off, although we learned she is quite the talented artist herself, having contributed a great square, of a drum-playing squirrel! I took the squares home and sewed them into a quilt, the kids having decided on the color for the sashing (it's in the school colors). I then came back to show them the finished project and it was great to see them so proud of their art and accomplishment.

Here is the finished quilt:


We hung the quilt in the main hallway of the school and put it up for the silent auction. One of the parents bought it and presented it to the teacher as a present at the end of the school year.

The next year I decided to reprise the process. I came into my daughter's now 5th grade class and we did it again. In many ways it was easier this time: the kids were older, and some of them had done the previous one with me. Most had a good idea what they wanted to do. I talked to them, and we came up with a theme, animals, and I left them to sketch. I came back again, with squares of white linen and plenty of markers, and again we drew for an hour or so. Some kids were missing that day but really wanted to participate so I left extra squares and markers. When everybody had done their squares, I picked them up, sewed them together and came back to show the kids.

Here it is: Shira's 5th grade quilt:


Once again I asked for, and got permission, to hang this up in the hallway, and we put it up for auction again.

It was great to share this hobby and passion of mine with the kids. They did a wonderful job, both times, and were rightly proud of themselves.
And I enjoyed every minute of it.

Thursday, November 25, 2010

Stain Glass Windows

A couple of years ago I went to my first quilt show. That was quite the experience for me. First I did a quick run-through, quickly taking in all the quilts. Then I started walking again, slowly, relishing the different styles, patterns, fabrics. There were artsy quilts and folksy ones. There were creations I would not necessarily call quilts, they were so far removed from "blanket", or quilting itself. These were creations of fabric, lace, wire, branches. Magnificent pieces of art that cannot be used in any way other than hanging on the wall and admiring. I got overwhelmed by the abundance and had to go out. But I came back the next day (and dragged my Mom with me). This time I was able to appreciate all of the pieces, each for its own beauty or craft, and I found myself getting into the techniques themselves. I found myself studying the patterns, trying to figure out how they were built and crafted. I also ogled the Way-to-expensive quilting long arm, the object of fantasies for if I had money to throw around, but that may be the topic for a different post.

One of the patterns I saw that really intrigued me was an optical illusion pattern that made the blocks float ABOVE the background, casting a shadow on the background.  I decided to try and make one like that, out of fabric I had at home. (I always seem to add challenges, don't I). I came home and looked all through my stash (which was in bags and boxes at the time). And found nothing.

A few months later I tried again, and found a beautiful, multi-colored batik fabric I'd somehow disregarded before. This fabric had black circly lines all over it. I also found a blue fabric with black swirls on it.  Together these two fabrics reminded me of stain glass windows, and an idea was at once created. I knew exactly what I wanted to do. This:


The red fabric provides the shadow of the stain glass squares and, to me, makes them appear to float above the blue background.
A detail:


I enjoy learning different patterns and techniques. Sometimes I wonder if I should take a class somewhere, and somehow I never do....I guess I like teaching myself, bungles and all.

And one for me

I rarely make quilts, or any sewing project, of which I myself is the recipient. I am constantly making things for others: family, friends, babies, co-workers, charity. I rarely make anything for me. I think this is common to artists, who don't make things for themselves but for the consumption of others. It is also, I think pretty common for mothers-taking care of others and their needs. But I also think it's personality.  I rarely pamper myself full on and I find it difficult to accept pampering from others (just ask AJ).

So it took quite a while before I made myself a quilt. I'd made several baby quilts by then, as well as a couple of twin size quilts for my girls as they moved to twin beds. I'd also made a bedspread or two. And then, I decided, it was my turn. I remember thinking about it specifically as a gift to myself. This came at a time when things were tight around here, spatially and financially. I'd just had a reduction in pay at work, and the girls and I moved to the smaller place downstairs as I could get more for renting the upstairs portion of the house to housemates. The place downstairs was not only smaller, but had poorer lighting and no tub; it was a definite step down. So as compensation for this, I decided to make myself a quilt, for MY bed.

This being such a special and unusual occasion, I decided to make myself a particularly complex quilt. My mom had given me a book about quilters years before and in it was a photograph of a beautiful strip quilt. I was able to figure out the pattern by studying the photo and make this. I call it "Strip Circles":


The quilt is made of triangles and strips (and our cat Elliott just had to get in the picture). The strips are all from my stash (you can tell I had been sewing for a number of years by now; look at all those fabrics!) and are one inch wide, before sewing. That's a lot of strips. I sewed the strips onto the triangles, making ever-increasing pizza slice-shaped pieces. I then sewed two slices together and combined them with triangles of the background fabric. This formed squares which I sewed together into larger squares, making the circles.

A close up:

This quilt took a bit of time to make, but not as long as I thought it would. Sewing machines and straight lines go well together. I pieced the top, along with the border, and used an Ikea comforter as batting. For the back I sewed together two kinds of red swirly fabrics and some solid burgundy to have two totally different effects on either side of the quilt (and thus my reversible quilt idea was born, an idea I will use many times over the years). I had it done in time for winter that year and was happy to cozy up in it.

A few years later I upgraded to a queen size bed and this no longer fit. It has since been used on the couch and in the guest room. It makes me smile to see it, every time.

Quilt for Shira

By the time Shira was born, I had already been quilting for a couple of years. Her quilt was one of the first baby quilts I made (I think the first one might have been for my cousin's daughter...). For Shira's quilt I decided to try my hand at a dynamic pattern, one that included movement in some way. I knew I did not want to have a super girly quilt; I still usually avoid gender-specific quilt color choices, unless I know that it would be important to the baby's parents. Also, for Shira, I knew I wanted something with lots of colors. The challenge, at the time, was finding a pattern that included lots of color but was not too chaotic. I needed something to tie the quilt together so it would not overwhelm a baby's sight. Taking baby sight into account I also knew some contrasting colors and/or patterns would work well. This is what I came up with:


The pattern is called "tilting stars" and in the book it had all of the stars in one color. I chose scraps to make each star a different color and put them in with the uniform white for cohesion and contrast. The purple sashing also helped tie the quilt together. A close up:


As it turned out, Shira was an extremely self sufficient baby. She spent time entertaining herself. She loved being on the quilt, looking at the different colors and patterns of the stars.

Thursday, November 18, 2010

A new baby quilt

A few weeks ago I finished a scrappy quilt in yellows and reds. It was designed for my newest cousin/niece (my cousin's daughter), who was born 8 weeks ago. I didn't want to post about it until I'd presented it to the Momma, but I did so tonight (and she loved it) and so here's a picture.
Flowers for Hadas:


It's the same Pattern as a quilt I made for another baby, Audrey, and about which I posted already.

Ducking Around with Audrey:


I was amazed by how wonderfully different they look with the different color palettes. In both of them the strips are from my stash, and I enjoyed the opportunity to use up different colors.

As always, it's so gratifying to me to see how fabrics continue to find their way into project after project, and how each project is sort of continued into the subsequent ones. In both of these I was able to incorporate fabrics from earlier quilts, and clothes I'd made for kids, and Halloween costumes. I was able to incorporate fabrics I was gifted over the years as well as fabric I'd bought.

I find this aspect of quilting both reflective and creative, looking back and forward at the same time.

Tuesday, November 16, 2010

Wall Hanging Bargello

A while ago my mother asked me to make a wall hanging for her dining room. She wanted something that would go with the colors of her dining room, burgundy and cream. She also asked that whatever I make not have sharp angles as the dining furniture have curvy lines.  I started thinking about different patterns, but could not find one I liked. I let the project lie dormant for a while as I worked on several other projects. Then, it was time, I decided. I took out all the books I have, looking for inspiration in the form of curvy lines. 
Now lately I've been on a "scrappy" kick, one that means I use scraps as often as I can. However, I couldn't do a scrappy here as I wanted the burgundy colors. Finally I found a pattern in a book of Bargello patterns. I'd bought the book years ago, after doing the Blue Cathedral, which is also a Bargello design. However, in the 9 or so years since I bought the book, I've not made a SINGLE Bargello quilt. This would now change. I found a pattern that involved dinky little pieces, in right angles, that when sewn together just so, make a curvy line to form an elliptical design.

Blurry picture:

And a detail:
 

I put loops on the back so it can be hung without breaking up the pattern in any way.

This quilt proved to be my most challenging yet.

First there were a gazillion points to match. Secondthe whole thing kept wanting to veer off center. I had to rip out more seams in this one project than I've had in all my previous ones, I think. Another frustration was the really rigid pattern. Now I know, Bargello's like that. Still.

AJ has learned long ago to give up on the "no one notices but you, hon. Really" so he just heard me vent, and picked the billion little bits of thread off of the couch/chair/jackets.

A few nights ago I gave it to my mother, who likes it, so she can hang it in her dining room.

Sunday, November 7, 2010

Yair and Joanna's Chuppah

A few years ago my brother Yair got married. He and his wife Joanna decided to have a community chuppah. They asked me if I would help and of course I said yes! They had their guests to send bits of fabric, beautiful or meaningful or both, to me, and I put the lot together into a patchwork Chuppah for them.

The fabrics include T-shirts belonging to my Dad, with photos of some of his grandchildren; fabric from a dress Joanna's grandmother had made for Joanna's mother when she was a teenager; strips from my grandmother's kitchen towels; commemoration t shirts; fabric drawn on with fabric markers, decorated by my youngest daughter and oldest niece; a piece with an embroidered message from my older daughter; silk given by one of Joanna's friends; and an embroidered purse, cut into its parts and incorporated. There are many other cuts of fabric contributed by more friends.

The experience was great, and quite meaningful to me. Not only did I get to Make a quilt for Yair and Joanna, but I got to learn and stretch as a quilter.

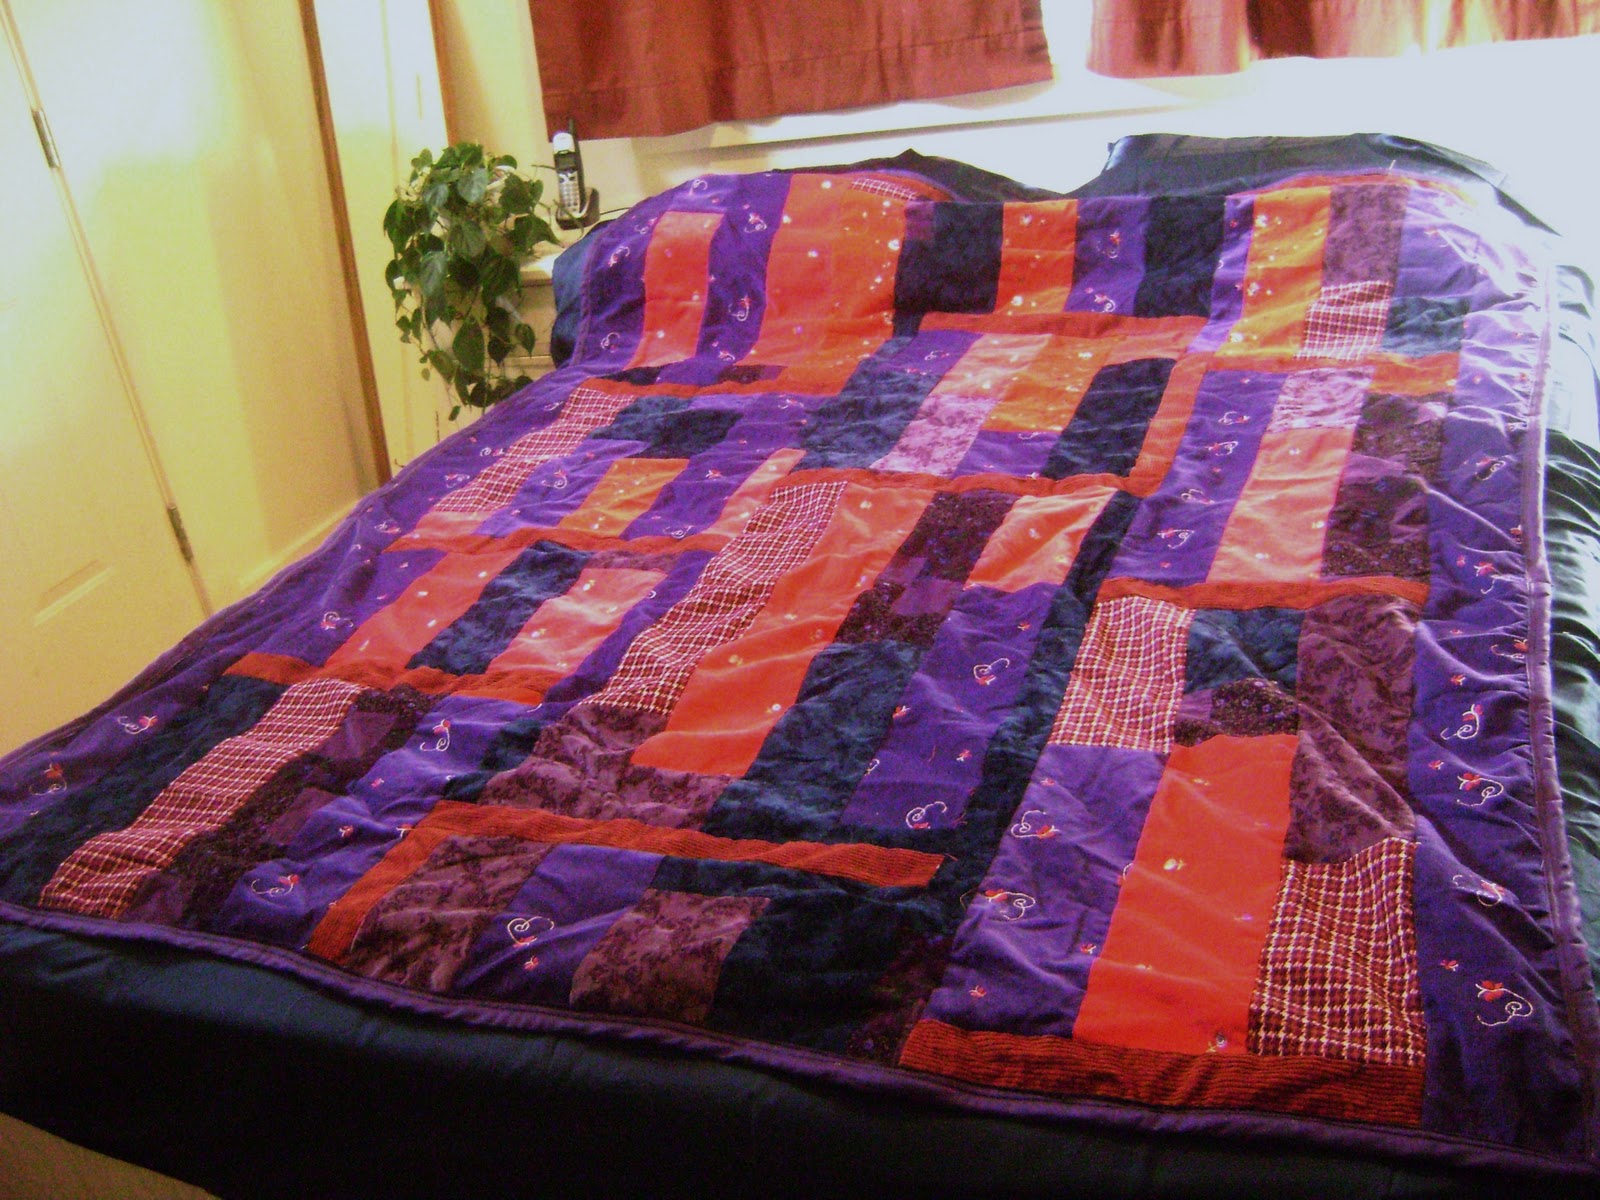
Since the piece grew as each contribution came in, I had no set plan before I started. This is reminiscent of the Crazy Quilt with two important differences. First, the pieces were not cut in weird angles and, second, I did not use decorative stitching. I did, however, incorporated lace, ribbons, yarn, and crocheted material. It was great to lay them all down, sew them together, and watch the piece come together.

Now, before I knew about Yair and Joanna's idea of the community Chuppah, I'd decided to make them one of my own. I asked them, and they said yes. This is what I made:
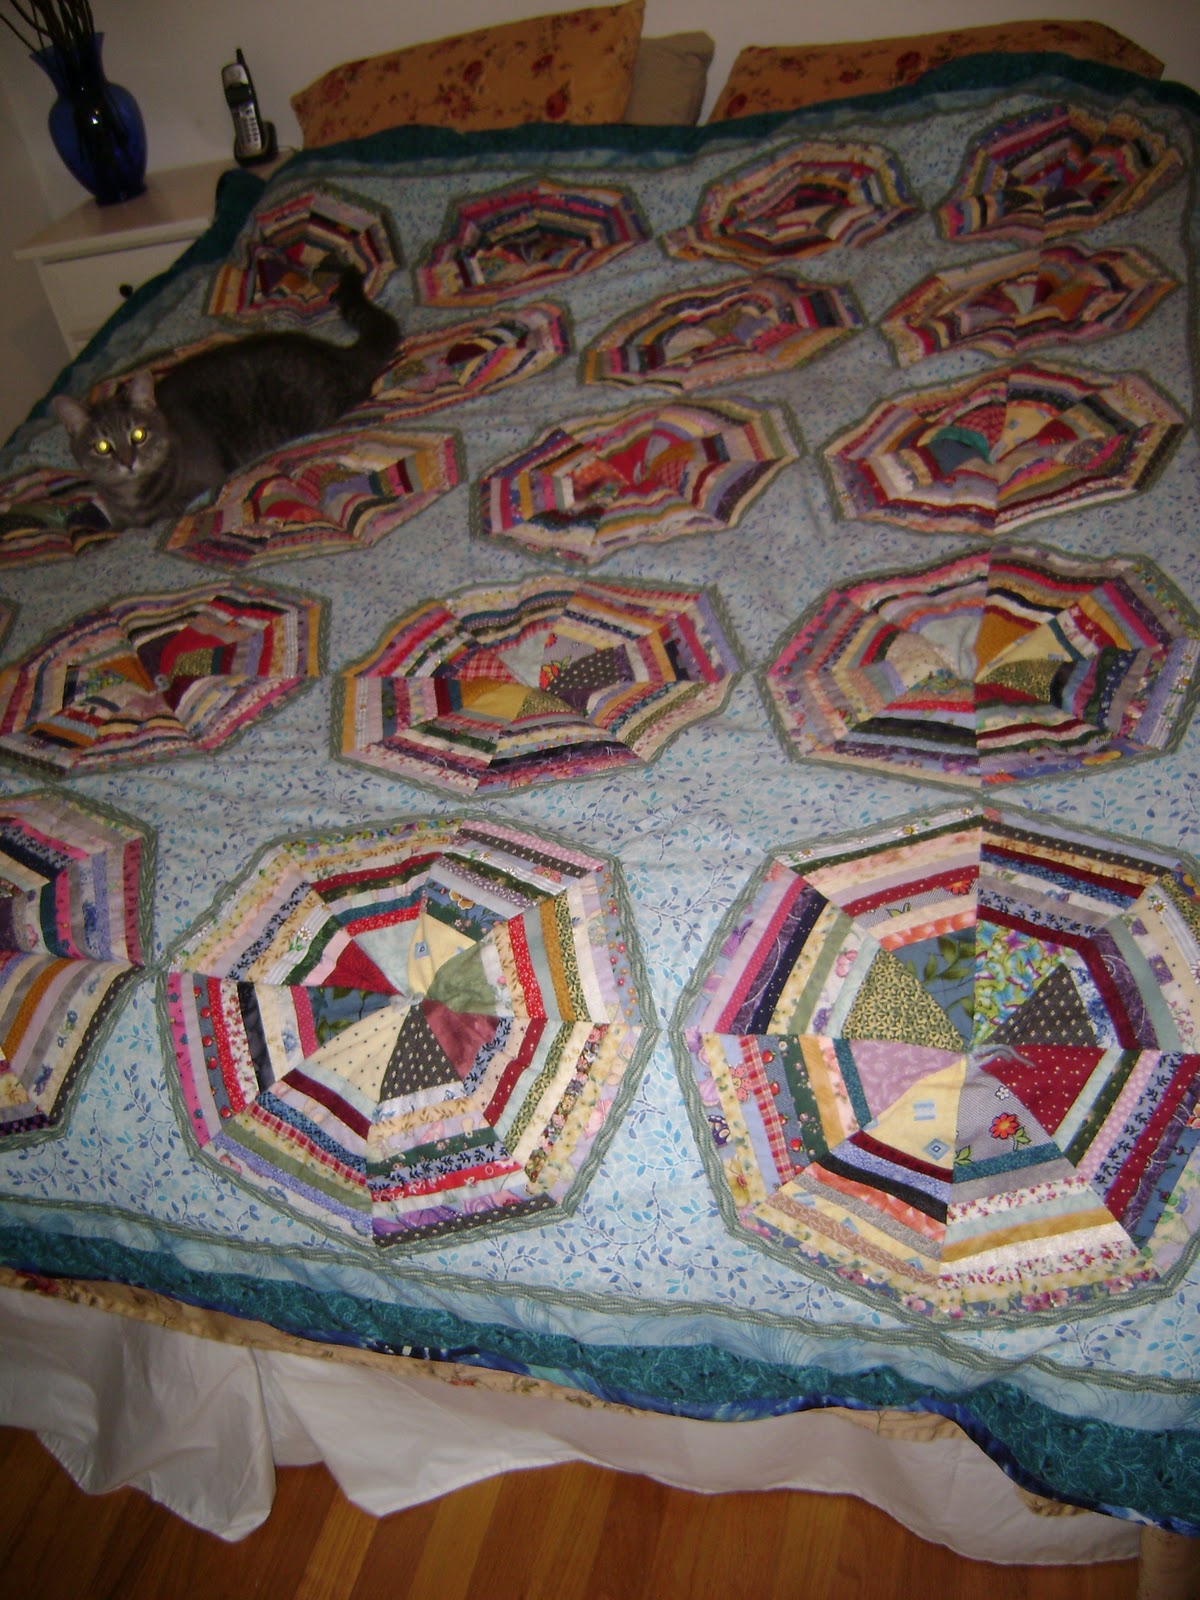

And a detail:

The center blocks are birds flying in a circle. I'd figured out the pattern from a picture in a book my mother gave me about quilters in America. It took a while, and some geometry, but I did figure it out. working with diamond-shaped pieces was interesting, and challenging.  The border is in the "flying geese" patten and is made with different-sized triangles.  This side of the Chuppah let me use many scraps I had and I was able to incorporate older fabric from various projects and clothes I'd made.

I made both pieces the same size, sewed them together, and voila! My brother and his wife had a double-sided Chuppah for their wedding.
The Chuppah is now hanging in their living room and they alternate the sides so that both are part of their house.
I get great pleasure from seeing it, and remembering the day, the process, and all the stories behind it.
One of the things I love most about quilting (or patchwork really) is the fact that it is so multilayered, but in fabric and in meaning. How great to be able to use fabric used by 4 different generations, of multiple families, across two continents, bringing together family and friends into one piece.

Friday, November 5, 2010

My First Quilt Ever

My eldest child did not get a quilt from me at her birth, but her birth is what, indirectly, started me on quilting.
When she was born my brother and our friend Shelley gave my daughter a quilted baby quilt, which was lovely. They'd both worked on it, including stitching embellishments on it, and it meant so much to me.  I loved the idea of a gift crafted with love, and the fact that it seemed such a versatile form of art. The possibilities seemed endless with this art form, and the fact that the result is usable made it even more attractive.

When I got my first sewing machine, I decided to try my hand at quilting. I bought a book, Quilting for Beginners, by Frank (the book is so old I cannot find a picture of it online. It was published in 1990), and started making things. I made a pillow for my mother with appliqued tulips, for example.

About a year into it I made my first quilt, a wall hanging for my daughter:


It is a modified star, and is appliqued rather than pieced.  I took the template for each ray and elongated it to different sizes so that the beams are not identical. The inner part of each ray is the same size, and the outer ones differ. However, each ray is the same fabric on the inner and outer parts. I sewed the star together, and the appliqued it onto the background. I put batting and backing fabric and sewed it all together. If you look at the back you can see one of my biggest beginner's mistakes. I quilted the piece with white thread, front and back. On the front it's fine since the fabric is also white. On the other hand, the backing is burgundy, with white seams all over it. I learned you can have a top and bottom thread of different colors, and that sometimes that is the right way to go.
Another thing I learned from this piece is the importance of basting. Up until then, it didn't matter so much since I used two layers of fabric, cotton mostly, with no batting. It was easy to line those up and keep them aligned. Batting makes things move however, and the top and bottom layers of this quilt are doing different things in the finished pieces. I fixed it so you can't see unless you're close to it and know what you are looking for, but the lesson of this has stayed with me: when quilting, baste.

The Red Starburst hung in my daugther's room for a long time, then in the hallway leading to her room. Now it's hanging in my study.

Thursday, November 4, 2010

Giving Something Back

For a while now I've been looking for ways to give something back, in my community. I have been looking for ways to use my skills/talents/time to help others. It took a while to figure out WHO I wanted to help; there are so many people who could use the help, and deserve it. There are so many causes and organizations. One of the ways I decided to help is by donating kids' quilts. The first thing I did, months ago, was make two quilts for Quilts For Kids: http://www.quiltsforkids.org/ That was great. I made two quilts for them.
Since then I've been trying to find a local organization that I could work with.
Two weeks ago I called Children's Hospital Oakland to see if they take quilts. They do. The hospital is a ten minute drive from my house, which makes it convenient for me. And they were so grateful. In fact, the lady there told me, they are having their annual fundraiser in mid-November, and would I mind if they raffled off some of my quilts at the fundraiser, the proceeds of which go to the trauma rehab ward. I said yes. Gladly, yes.
Today I drove to the hospital, met with the nice lady and handed over several quilts. Some have been with me for a while, and all of them are for kids, the largest being a twin sized quilt.
And here they are!

Box of BonBons:


Kimonos Galore:


Monkeys in the Middle:

Purple Ladder:


Summertime Rag Quilt


I also gave the lady two sets of decorative pillows I'd made for earlier incarnations of my living room (I forgot to take pictures of them before I gave them away).
The nice lady will send me their blanket specifications so I can donate some quilts to be used in the hospital itself. This will be an ongoing thing for me.
I am pleased.

Wednesday, November 3, 2010

My first Bargello

When I started quilting, I worked from a book. I'd been sewing for a while at that point, having learned to sew when I was pretty young. My grandmother taught me how to sew and I remember making clothes for my Barbie Doll. They were pretty simple as I recall, but I was proud of them. When I was a teenager my grandmother and I made me a reversible skirt, a full circle skirt, 50s style. This was a joy. We went to the fabric store, and I got my first rush of touching bolts of fabric. We got some fabric and a pattern, and spent several happy afternoons on her dining room floor, marking, measuring and cutting, while she was telling me stories of her own youth. A wonderful time; I got to know my grandmother as a person during those afternoons.
She taught me to sew on her old, foot-pedaled Singer and I remember not quite believing her when she said she needed help threading because she couldn't see the eye of the needle anymore. I think of her whenever I start a new project, and nearly every time I sit at my own machine.

By the time I started quilting, she was no longer around to teach me or help me learn, and so I had to rely on a book. I had gotten a sewing machine as a birthday gift the year before, after my family decided that hand stitching a shirt for my fully-grown, big-shouldered big brought, was too much. They all got together to buy me a machine. A Brothers machine which lasted me 10 years. (I now have a Singer.)

One  of the first projects I made with my Brothers machine and using the quilting for beginners book (whose title I shall have to look up) was a fairly simple Bargello design, The Blue Cathedral:


This was done with strips of increasingly dark blues, and was a good way to learn about color palettes and grades. The Bargello patterns are highly mathematical and the book made it easier by calculating the different widths I needed of each color at each line. I quilted the Cathedral with metallic silver thread and it has been hanging in my living rooms for about 13 years now. If I look at it closely I can see all the rookie mistakes I made with this quilt, and the points that don't match up, but it still makes me smile to look at it.

Tuesday, November 2, 2010

A Bed Spread for my parents

Many moons ago, I made my parents a bed spread. This was one of my first projects, and I remember I was working from a book, out of which I think I ended up doing at least 80% of the projects. This one enabled me to use scraps from the fabrics I'd bought for some of the clothes I made for my girls when they were little. I had been sewing for about 5 years at this point, quilting for 4 of them, and I wanted to try my hand at a big project. When my mom admired some of the baby quilts I'd done, I decided to make a queen sized bed spread for my parents' bed:
And a close up:
You can see in this close up that I did not calculate the fabric correctly and so ran out of the burgundy sashing fabric. Oh well.
My parents like it, and I learned a lot from making this quilt, namely triangles and angles. Matching u those angles is tricky to learn sometimes.